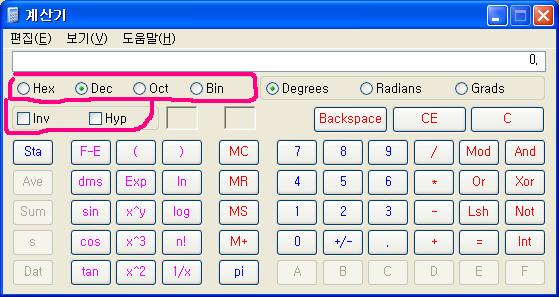
저기 빨간부분을 추가해야되는데..
import java.awt.*; // AWT(Abstract Window Toolkit)을 사용하기 위하여 임포트한다
import javax.swing.*; // 그래픽구현시 swing을 사용하기 위하여 임포트한다
import java.awt.event.*; // 이벤트 객체를 사용하기 위하여 임포트한다
import java.awt.Dimension;
import java.awt.GridLayout;
import java.awt.Panel;
import java.awt.TextField;
import java.awt.Toolkit;
import java.awt.event.ActionEvent;
import java.awt.event.ActionListener;
import javax.swing.JFrame;
import javax.swing.JPanel;
import javax.swing.JRadioButton;
// 기본적으로 JFrame을 상속받으며, WindowListener와 ActionListener를
// implement함으로써 이벤트 객체를 활용한다
public class adx extends JFrame implements WindowListener,ActionListener{
// private TextField tf = null;
private Panel tp = null;
private Button bp = null;
private JRadioButton Hex,Dec,Oct,Bin = null;
Checkbox cb1,cb2;
private Dimension dimen,dimen1;
private int xpos, ypos, tot;
Button n7,n8,n9,n4,n5,n6,n1,n2,n3,n0,x1,x2,y1,y2,y3,y4,a1,a2,a3,a4,b1,b2,b3,b4,b5,w1,w2,w3,w4,w5,w6; // 계산기에 쓰일 각각의 버튼을 생성한다
Panel p1,p2; // 두개의 패널을 생성한다
TextField tf; // 계산기의 계산과정과 결과값을 처리할 텍스트필드를 생성한다
String str; //문자열을 입력받을 변수선언
long num,result; // 결과값을 저장할 변수선언
boolean ok,plus,minus,gob,nanut; // 이벤트를 수행할 boolean변수 선언
Container con; // 위에서 생성한 두개의 패널을 붙인 컨테이너선언
FlowLayout layout; // 정렬방식인 FlowLayout의 객체를 선언한다
public adx() // Design클래스의 생성자
{
super("계산기");
}
---------------------------------------요기서부터-----------------------------------------------------------
public void init() {
setSize(254, 336);
JPanel p = new JPanel();
p.setLayout(null);
dimen = Toolkit.getDefaultToolkit().getScreenSize();
dimen1= this.getSize();
xpos= (int)(dimen.getWidth()/2 - dimen1.getWidth()/2);
ypos = (int)(dimen.getHeight()/2 - dimen1.getHeight()/2);
this.setLocation(xpos, ypos);
this.setVisible(true);
tf = new TextField(25);
tf.setEditable(false);
tp = new Panel();
tp.add(tf);
tp.setVisible(true);
bp = new ButtonPanel(tf);
bp.setVisible(true);
p.add(tf); p.add(bp);
tf.setBounds(40,10,170,30);
bp.setBounds(0,150,250,160);
setVisible(true);
cb1 = new Checkbox("Inv");
cb2 = new Checkbox("Hyp");
p.add(cb1); p.add(cb2);
cb1.setBounds(25,100,50,20);
cb2.setBounds(75,100,50,20);
Hex = new JRadioButton("Hex");
Dec = new JRadioButton("Dec");
Oct = new JRadioButton("Oct");
Bin = new JRadioButton("Bin");
p.add(Hex); p.add(Dec); p.add(Oct); p.add(Bin);
Hex.setBounds(20,60,50,20);
Dec.setBounds(70,60,50,20);
Oct.setBounds(120,60,50,20);
Bin.setBounds(170,60,50,20);
add(p);
}
---------------------------------------이까지 퍼왓는데 코드가 안먹히네 머가문제일까 ㅠㅠ 안떠화면에---------------------------
public static void main(String args[]){
adx de = new adx(); // Design클래스의 객체 de를 생성한다
de.go(); // Design클래스의 객체 de의 멤버함수 go()를 실행한다
}
public void go(){
con = getContentPane();
con.setLayout(new BorderLayout());
// 컨테이너를 생성함과 동시에 컨테이너의 배경색을 노란색으로 하며
// 기본적인 정렬은 BorderLayout으로 한다
tf = new TextField("0",24); // 계산과정과 결과값을 나타낼 텍스트필드를 생성하며, 기본값은 0으로한다
layout = new FlowLayout(); //FlowLayout으로 초기화
p1 = new Panel(); // 첫번째 패널을 생성한다
p1.setLayout(layout); // 첫번째패널의 정렬방식은 위에서 선언한 FlowLayout으로 한다
p2 = new Panel(); // 두번째 패널을 생성한다다
p2.setLayout (new GridLayout(5,6,5,5));
// 두번째 패널의 정렬방식은 GridLayout이며, 4행4열로 정렬하며, 수평, 수직간격은 각각 5로 한다
p1.add(tf); // 위에서 생성한 텍스트박스의 객체를 패널1에 붙인다
layout.setAlignment(FlowLayout.CENTER); // FlowLayout.CENTER으로 배치
con.add(p1,BorderLayout.CENTER); // 패널1을 화면의 중앙에 오도록하여 컨테이너에 붙인다
con.add(p2,BorderLayout.SOUTH); // 패널2를 화면의 아랫쪽에 오도록하여 컨테이너에 붙인다
//////////////////////각각의 버튼을 설정///////////////////////////////////
w1 = new Button("");
w2 = new Button("");
w3 = new Button("");
w4 = new Button("Backspace");
w5 = new Button("CE");
x1 = new Button("C");
a1 = new Button("MC");
n7 = new Button("7");
n8 = new Button("8");
n9 = new Button("9");
y1 = new Button("/");
b1 = new Button("sqrt");
a2 = new Button("MR");
n4 = new Button("4");
n5 = new Button("5");
n6 = new Button("6");
y2 = new Button("*");
b2 = new Button("%");
a3 = new Button("MS");
n1 = new Button("1");
n2 = new Button("2");
n3 = new Button("3");
y3 = new Button("-");
b3 = new Button("1/x");
a4 = new Button("M+");
n0 = new Button("0");
x2 = new Button("+/-");
y4 = new Button(".");
b5 = new Button("+");
b4 = new Button("=");
///////////////////////////////////////////////////////////////////////////
//////////////////// 위에서 생성한 버튼을 패널2에다가 붙인다/////////////////////////
p2.add(w1);
p2.add(w2);
p2.add(w3);
p2.add(w4);
p2.add(w5);
p2.add(x1);
p2.add(a1);
p2.add(n7);
p2.add(n8);
p2.add(n9);
p2.add(y1);
p2.add(b1);
p2.add(a2);
p2.add(n4);
p2.add(n5);
p2.add(n6);
p2.add(y2);
p2.add(b2);
p2.add(a3);
p2.add(n1);
p2.add(n2);
p2.add(n3);
p2.add(y3);
p2.add(b3);
p2.add(a4);
p2.add(n0);
p2.add(x2);
p2.add(y4);
p2.add(b5);
p2.add(b4);
///////////////////////////////////////////////////////////////////////////
///////////////////// 각각의 버튼에 대한 색을 지정해준다///////////////////////////
w1.setForeground(Color.BLUE);
w2.setForeground(Color.BLUE);
w3.setForeground(Color.BLUE);
w4.setForeground(Color.RED);
w5.setForeground(Color.RED);
x1.setForeground(Color.RED);
a1.setForeground(Color.RED);
n7.setForeground(Color.BLUE);
n8.setForeground(Color.BLUE);
n9.setForeground(Color.BLUE);
y1.setForeground(Color.RED);
b1.setForeground(Color.BLUE);
a2.setForeground(Color.RED);
n4.setForeground(Color.BLUE);
n5.setForeground(Color.BLUE);
n6.setForeground(Color.BLUE);
y2.setForeground(Color.RED);
b2.setForeground(Color.BLUE);
a3.setForeground(Color.RED);
n1.setForeground(Color.BLUE);
n2.setForeground(Color.BLUE);
n3.setForeground(Color.BLUE);
y3.setForeground(Color.RED);
b3.setForeground(Color.BLUE);
a4.setForeground(Color.RED);
n0.setForeground(Color.BLUE);
x2.setForeground(Color.BLUE);
y4.setForeground(Color.BLUE);
b5.setForeground(Color.RED);
b4.setForeground(Color.RED);
//////////////////////////////////////////////////////////////////////////
/////////////////////// 윈도우리스너설정/////////////////////////////////////
addWindowListener(this);
n1.addActionListener(this);
n2.addActionListener(this);
n3.addActionListener(this);
n4.addActionListener(this);
n5.addActionListener(this);
n6.addActionListener(this);
n7.addActionListener(this);
n8.addActionListener(this);
n9.addActionListener(this);
n0.addActionListener(this);
b4.addActionListener(this);
b5.addActionListener(this);
y1.addActionListener(this);
y2.addActionListener(this);
y3.addActionListener(this);
b2.addActionListener(this);
x1.addActionListener(this);
/////////////////////////////////////////////////////////////////////////
///////////////////// 액션리스너설정////////////////////////////////////////
y4.addActionListener( new ButtonPlus() );
y3.addActionListener( new ButtonMinus() );
y2.addActionListener( new ButtonGob() );
y1.addActionListener( new ButtonNanut()) ;
////////////////////////////////////////////////////////////////////////
setSize(400,260);
setVisible(true);
}
// 플러스버튼이 눌러졌을 경우 puls = true
class ButtonPlus implements ActionListener {
public void actionPerformed(ActionEvent ae){
plus=true;
}
}
//마이너스버튼이 눌러졌을 경우 minus = true
class ButtonMinus implements ActionListener {
public void actionPerformed(ActionEvent ae){
minus=true;
}
}
//곱셈버튼이 눌러졌을 경우 gob = true
class ButtonGob implements ActionListener {
public void actionPerformed(ActionEvent ae){
gob=true;
}
}
//나눗셈버튼이 눌러졌을 경우 nanut = true
class ButtonNanut implements ActionListener {
public void actionPerformed(ActionEvent ae){
nanut=true;
}
}
public void actionPerformed(ActionEvent e){
String mmn = e.getActionCommand(); // 입력되어지는 값들을 문자열변수 mmn에 저장한다
if(mmn.equals("1")||mmn.equals("2")||mmn.equals("3")||mmn.equals("4")||mmn.equals("5")||mmn.equals("6")||mmn.equals("7")||mmn.equals("8")||mmn.equals("9")||mmn.equals("0")){
// 입력된 값이 숫자인지 확인하여 숫자일 경우 입력이 끝날때까지 입력받아서 str변수에 저장한다
if(str != null){str = str + mmn; }
else
{
str = mmn;
}
tf.setText(str); // 텍스트필드에 입력되는 값을 str에 저장한다
num = Long.parseLong(str); // str에 저장된 입력값을 정수값으로 변환하여 num값에 입력한다
}
//////////////////////////// 사칙연산을 수행하는 알고리즘////////////////////...
else if(mmn.equals("+")||mmn.equals("-")||mmn.equals("*")||mmn.equals("/")||mmn.equals("=")){
// 입력되는 값이 숫자가 아닌 사칙연산일 경우에는 입력된 값에 대하여 아래와 같이 사칙연산을 수행하여
// result값에 저장한다
if(result == 0){result=num;}
if(ok==true){
if(mmn.equals("+")){result = result + num;}
else if(mmn.equals("-")){result = result - num;}
else if(mmn.equals("*")){result = result * num;}
else if(mmn.equals("/")){result = result / num;}
else if(plus==true&&mmn.equals("=")){result = result + num;plus=false;}
else if(minus==true&&mmn.equals("=")){result = result - num;minus=false;}
else if(gob==true&&mmn.equals("=")){result = result * num;gob=false;}
else if(nanut==true&&mmn.equals("=")){result = result / num;nanut=false;}
str =""; str = new Long(result).toString();tf.setText(str);num=0;
}
ok=true;str="";
}
//////////////////////////////////////////////////////////////////////
else if(mmn.equals("C")){num=0;result=0;ok=false;str="";tf.setText(str);}}
// C버튼이 눌러질경우 num, result를 0으로 초기화하고 ok, str모두 처음값으로 초기화한다
///////////// 윈도우리스너를 implement했기때문에 선언해줘야 할부분 ///////////////////
public void windowClosing(WindowEvent e){System.exit(0);}
public void windowOpened(WindowEvent e) { }
public void windowIconified(WindowEvent e) { }
public void windowDeiconified(WindowEvent e) { }
public void windowClosed(WindowEvent e) { }
public void windowActivated(WindowEvent e) { }
public void windowDeactivated(WindowEvent e) { }
////////////////////////////////////////////////////////////////////////////////
}


댓글 영역
획득법
① NFT 발행
작성한 게시물을 NFT로 발행하면 일주일 동안 사용할 수 있습니다. (최초 1회)
② NFT 구매
다른 이용자의 NFT를 구매하면 한 달 동안 사용할 수 있습니다. (구매 시마다 갱신)
사용법
디시콘에서지갑연결시 바로 사용 가능합니다.